Linux NGINX服务 |
您所在的位置:网站首页 › linux nginx升级 › Linux NGINX服务 |
Linux NGINX服务
|
NGINX与Apache对比
轻量级,Nginx比apache 占用更少的内存及资源;静态处理,Nginx 静态处理性能比 Apache 高 ;Nginx可以实现无缓存的反向代理加速,提高网站运行速度;Nginx的性能和可伸缩性不依赖于硬件,Apache依赖于硬件;Nginx支持热部署,启动速度迅速,可以在不间断服务的情况下,对软件版本或者配置进行升级;nginx(异步不阻塞)是异步进程,多个连接可以对应一个进程 ;apache是同步多进程,一个连接对应一个进程;Nginx高度模块化,编写模块相对简单,且组件比Apache少高并发下nginx 能保持低资源低消耗高性能;Nginx 配置简洁, Apache配置复杂;
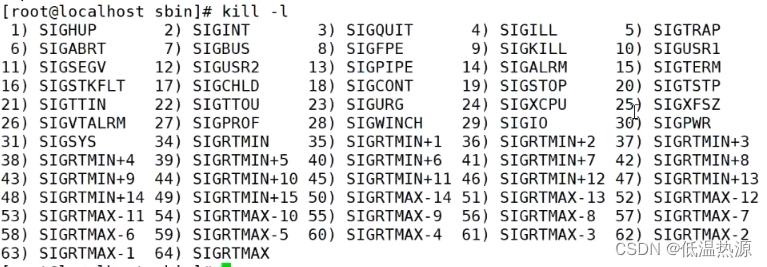
通俗的讲,就是 nginx 是轻量级web应用,apache 相比较则更重量 nginx 占用内存等资源更少 nginx 处理静态页面请求性能更好 nginx 模块配置相对简单,简洁,apache 则配置复杂 nginx 处理请求是异步非阻塞,apache 则是阻塞的 nginc 基于事件的web服务器, apache 是基于流程的web服务器 nginx 所有请求由一个线程处理,apache 单个线程处理单个请求 nginx 使用场景更多(web服务器,反向代理服务器与负载均衡,缓存服务器等) NGINX单台服务器可支持30000-50000个并发(面试题)(实际上大约20000-30000。Apache只有几千不到10000,大概差2-3倍) nginx 的最大并发能力怎么看?worker_processes x worker_connections (工作进程数,通常设置与cpu数量一致,或auto)* (每个worker进程能够处理的连接数) 并且需要设置NGINX的worker_rlimit_nofile(设置所有worker进程最大可以打开的文件数,匹配上worker_connections) 还需要配置系统的最大打开文件数 ulimit -n XXX(xxx为文件打开数量)(临时设置) 或vim /etc/security/limits.conf --> nofile 进程能够打开的文件数(文件描述符、文件句柄) (永久设置) nginx 当前并发连接数怎么看?方法1. 开启 --with-http_stub_status_module 状态统计模块,配置文件 开启状态统计功能 stub_status on; 访问状态统计页面,看 Active connections: 方法2. netstat/ss -natp | grep nginx | grep -c ESTABLISHED --------编译安装Nginx服务-------- 1.关闭防火墙,将安装nginx所需软件包传到/opt目录下nginx-1.12.0.tar.gz 关闭防火墙 systemctl stop firewalld systemctl disable firewalld setenforce 0 vim /etc/selinux/config disable 永久关闭selinux 2.安装依赖包nginx的配置及运行需要pcre、zlib、openssl等软件包的支持,因此需要安装这些软件的开发包,以便提供相应的库和头文件。 yum -y install pcre-devel zlib-devel openssl-devel gcc gcc-c++ make 3.创建运行用户、组Nginx 服务程序默认以 nobody 身份运行,建议为其创建专门的用户账号,以便更准确地控制其访问权限) useradd -M -s /sbin/nologin nginx 4.编译安装Nginx cd /opt tar zxvf nginx-1.12.0.tar.gz -C /opt/配置软件 cd nginx-1.12.0/ ./configure \ --prefix=/usr/local/nginx \ #指定nginx的安装路径 --user=nginx \ #指定用户名 --group=nginx \ #指定组名 --with-http_stub_status_module #启用 http_stub_status_module 模块以支持状态统计 ···················································· cd nginx-1.12.0/ ./configure \ --prefix=/usr/local/nginx \ --user=nginx \ --group=nginx \ --with-http_stub_status_module编译安装 make -j 8 make install让系统识别nginx的操作命令 ln -s /usr/local/nginx/sbin/nginx /usr/local/sbin/ #让系统识别nginx的操作命令安装完成后查看 cd /usr/local/nginx/sbin/nginx ./nginx -v #版本 ./nginx -V #版本和配置 5.检查、启动、重启、停止 nginx服务检查配置文件是否配置正确 nginx -t 启动nginx可以直接输入nginx,但是完整路径启动更好(生产环境多用完整路径) /usr/local/nginx/sbin/nginx 停止nginx cat /usr/local/nginx/logs/nginx.pid #先查看nginx的PID号 kill -3 kill -s QUIT kill -s QUIT $(cat /usr/local/nginx/logs/nginx.pid) #kill -s QUIT = kill -3 留下日志关闭 killall -3 nginx killall -s QUIT nginx #不建议,killall根据名字会误杀kill -l 9 SIGKILL 强关 15 SIGTERM 自行关(默认) 3 SIGQUIT 留下日志关闭 1 SIGNHUP 重载配置
重新打开日志文件 kill -USR1平滑升级 kill -USR2执行make update就相当于kill -USR2(平滑升级) 验证nginx进程是否存在 netstat -lntp | grep nginx #查看nginx进程是否存在 方法1 通过端口号/网络 ss -lntp | grep nginx killall -0 nginx #查看nginx进程是否存在 方法2 通过killall -0检测进程存在 echo $? #获取执行结果(存在为0且不提示 不存在为1且no process found) ps aux | grep nginx #检测nginx进程是否存在 方法3 ps aux显示进程grep筛选
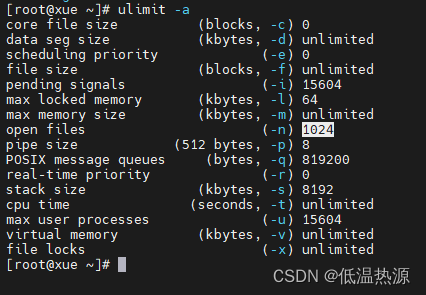
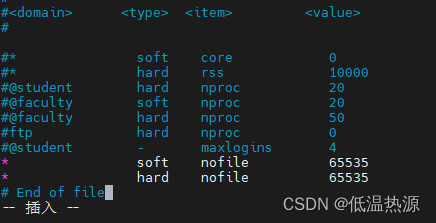
master管理work进程,启动nginx读取配置文件 work真正的处理用户请求的进程 解压新版本包 tar -zxvf nginx-1.xx.xx.tar.gz cd nginx-1.xx.xx更新前查看当前配置,以便增加配置 cd /usr/local/nginx/sbin/nginx ./nginx -v #版本 ./nginx -V #版本和配置配置软件 ./configure \ --prefix=/usr/local/nginx \ --user=nginx \ --group=nginx \ --with-http_stub_status_module --with-http_ssl_module备份文件 mv /usr/local/nginx/sbin/nginx /usr/local/nginx/sbin/nginx_old cp objs/nginx /usr/local/nginx/sbin/nginx升级 make upgrade #执行make update就相当于kill -USR2(平滑升级)#要保证当前 nginx 进程是通过 /usr/local/nginx/sbin/nginx 启动的,而不是通过查找环境变量中那个 nginx 命令启动的 #或者先 killall nginx ,再/usr/local/nginx/sbin/nginx 6.添加 Nginx 系统服务 方法一创建/etc/init.d/nginx执行脚本 vim /etc/init.d/nginx #!/bin/bash #chkconfig: - 99 20 #description:Nginx Service Control Script COM="/usr/local/nginx/sbin/nginx" PID="/usr/local/nginx/logs/nginx.pid" case "$1" in start) $COM ;; stop) kill -s QUIT $(cat $PID) ;; restart) $0 stop $0 start ;; reload) kill -s HUP $(cat $PID) ;; *) echo "Usage: $0 {start|stop|restart|reload}" exit 1 esac exit 0完善脚本,添加if判断输出状态 vim /etc/init.d/nginx #!/bin/bash #chkconfig: - 99 20 #description:Nginx Service Control Script CMD="/usr/local/nginx/sbin/nginx" PIDFILE="/usr/local/nginx/logs/nginx.pid" COUNT=$(ps -ef | egrep -v "service|grep|$$" | grep -c "nginx") # ps -ef获得进程 # 用egrep -v排除service|$$|grep # 添加service过滤(由于service命令启动nginx时会有一个service nginx start进程,会被误判) # 添加$$过滤 $$为获取当前脚本进程pid(由于脚本叫nginx.sh会误当成nginx进程,会被误判) # 添加grep过滤(由于grep筛选也会有grep nginx进程,会被误判) # 最后grep -c过滤出nginx进程数量。大于0即为存在nginx。 #检测nginx是否启动另外两种方法如下 上面通过查看进程 #killall -0 nginx 通过killall命令 #netstat -lntp | grep nginx 、$? 通过网络 case "$1" in start) #netstat -lntp | grep nginx #if [ $? -eq 0 ] if [ $COUNT -ge 1 ] then echo "NGINX 已经启动" else echo "NGINX 正在启动" $CMD fi ;; stop) kill -s QUIT $(cat $PIDFILE) ;; restart) $0 stop $0 start ;; reload) kill -s HUP $(cat $PIDFILE) ;; status) if killall -0 nginx &> /dev/null then echo "NGINX 正在运行" else echo "NGINX 未启动" fi ;; *) echo "Usage: $0 {start|stop|restart|reload|status}" exit 1 esac exit 0添加为系统服务 增加权限(看情况可以不用) chmod +x /etc/init.d/nginxchkconfig 添加服务以便systemctl命令调用 chkconfig --add nginx #这里的nginx为/etc/init.d/nginx刚刚编写的脚本文件此时可用service systemctl命令对nginx进行操作 systemctl start nginx systemctl stop nginx 方法二创建/usr/lib/systemd/system/nginx.service 服务文件 vim /lib/systemd/system/nginx.service [Unit] Description=nginx After=network.target [Service] Type=forking PIDFile=/usr/local/nginx/logs/nginx.pid ExecStart=/usr/local/nginx/sbin/nginx ExecReload=/bin/kill -s HUP $MAINPID ExecStop=/bin/kill -s QUIT $MAINPID PrivateTmp=true [Install] WantedBy=multi-user.target --------------------------------------------------------- [Unit]:服务的说明 Description:描述服务 After:依赖,当依赖的服务启动之后再启动自定义的服务 [Service]服务运行参数的设置 Type=forking是后台运行的形式,使用此启动类型应同时指定PIDFile=,以便systemd能够跟踪服务的主进程。 ExecStart为服务的具体运行命令 ExecReload为重启命令 ExecStop为停止命令 PrivateTmp=True表示给服务分配独立的临时空间 注意:启动、重启、停止命令全部要求使用绝对路径 [Install]服务安装的相关设置,可设置为多用户 ---------------------------------------------------------添加权限(看情况可以不用) chmod 754 /lib/systemd/system/nginx.service重载systemd配置 systemctl daemon-reload此时可用systemctl对nginx进行设置 systemctl start nginx.service systemctl enable nginx.service查看 nginx 是否打开 netstat -lntp | grep nginx --------认识Nginx服务的主配置文件 nginx.conf-------- 查看nginx.conf文件 去除注释行 cat /usr/local/nginx/conf/nginx.conf | egrep -v "^$|^/s*#" egrep -v ^$ 去除空白行 egrep -v ^/s*# 去除 ^开头 /s空格字符 *n次空白空格 #后面加上# ///去除开头多次空白空格#的行/// 不用^.*#因为遇到 keepalive——timeout 65# 此类的行会因为匹配任意字符任意次#被吞掉。.任意字符替换为/s任意行1、全局块:全局配置,对全局生效; 2、events块:配置影响 Nginx 服务器与用户的网络连接; 3、http块:配置代理,缓存,日志定义等绝大多数功能和第三方模块的配置; 4、server块:配置虚拟主机的相关参数,一个 http 块中可以有多个 server 块; 5、location块:用于配置匹配的 uri ; 6、upstream:配置后端服务器具体地址,负载均衡配置不可或缺的部分。 nginx.conf 配置文件 vim /usr/local/nginx/conf/nginx.conf 1.全局配置 #user nobody; #运行用户,若编译时未指定则默认为 nobody worker_processes 8; #✨工作进程数量,一般设置为和 CPU 核数一样;设置为auto,nginx将会自己获取这个数值 #error_log logs/error.log; #错误日志文件的位置 #pid logs/nginx.pid; #PID 文件的位置 worker_rlimit_nofile 60000; #✨设置所有worker进程最大可以打开的文件数,默认为1024 工作进程设置多少?(面试题)与服务器CPU核心数量对应(16核心 worker_processes=16), 或者设置auto让nginx自行调整 查看CPU核心数量 lscpu top cat /proc/cpuinfo打开文件数修改 可以设置worker_rlimit_nofile 60000,但是系统可能不支持。 使用 ulimit -a 命令查看系统可打开最大文件数,ulimit -n临时修改,/etc/security/limits.conf永久修改。 ulimit -a
locate块 根据用户访问url匹配路径,跳转到相应的html文件路径 注意 location /file 诸如此类的路径不要加上斜杠写成 location /file/ 否则转化完的网站也会多出斜杠变成//导致错误 location / { ##网站根目录的位置/usr/local/nginx/html root html; ##默认首页文件名 index index.html index.php; } root alias 路径区别(面试题)root(根路径配置) root /var/www/html 请求www.xue.com/test/1.html,会返回文件/var/www/html/test/1.html /test 的根目录是 /var/www/html ,跟在后面 location /test { #如果浏览器访问/test/1.html root /var/www/html; #则Linux文件系统中访问/var/www/html文件夹下 /test/1.html文件 }alias(别名配置) alias /var/www/html 请求www.xue.com/test/1.html,会返回文件/var/www/html/1.html /test 的别名就是 /var/www/html ,直接替代 location /test { #如果浏览器访问/test/1.html alias /var/www/html; #则Linux文件系统中访问/var/www/html文件夹下 /1.html文件 }proxy_pass(反向代理配置) 日志格式设定 $remote_addr(上一个服务器地址 可能是代理服务器地址)与$http_x_forwarded_for(最初发出请求的服务器地址 无视代理服务器)用以记录客户端的ip地址; $remote_user:用来记录客户端用户名称; $time_local: 用来记录访问时间与时区; $request: 用来记录请求的url与http协议; $status: 用来记录请求状态;成功是200, $body_bytes_sent :记录发送给客户端文件主体内容大小; $http_referer:用来记录从哪个页面链接访问过来的(可以依此做防盗链); $http_user_agent:记录客户浏览器的相关信息;通常web服务器放在反向代理的后面,这样就不能获取到客户的IP地址了,通过$remote_add拿到的IP地址是反向代理服务器的iP地址。 反向代理服务器在转发请求的http头信息中,可以增加x_forwarded_for信息,用以记录原有客户端的IP地址和原来客户端的请求的服务器地址。
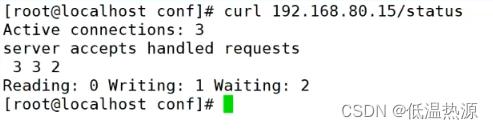
模块默认开启 若要关闭./configure时加上 --without-http-cache参数关闭 如果模块关闭 需要开启./configure时加上 --with-http-cache参数开启 vim /opt/nginx-1.12.0/auto/options 2.修改 nginx.conf 配置文件,指定访问位置并添加 stub_status 配置 cd /usr/local/nginx/conf cp nginx.conf nginx.conf.bak vim /usr/local/nginx/conf/nginx.conf ...... http { ...... server { listen 80; server_name www.xue.com; charset utf-8; location / { root html; index index.html index.php; } ##添加 stub_status 配置## location /status { #访问位置为/status stub_status on; #打开状态统计功能 access_log off; #关闭此位置的日志记录 } } } 3.重启服务,访问测试 systemctl restart nginx浏览器访问 http://192.168.80.101/status Active connections:表示当前的活动连接数,即当前与 Nginx 服务器建立的连接数。 server accepts handled requests :表示已经处理的连接信息 三个数字依次表示服务器已接收的连接数;服务器成功处理的连接数;服务器累计处理的总请求数(在保持连接模式下,请求数量可能会大于连接数量) Reading:表示当前正在从客户端读取数据的连接数。 Writing:表示当前正在向客户端写入数据的连接数。 Waiting:表示当前空闲并等待请求的连接数。 可以curl http://192.168.80.101/status 文本获取网页,并且结合 awk与if 语句进行性能监控。 编写脚本,连接数超过1000个报警 ,10秒检测一次 --------访问控制-------- ---基于授权的访问控制--- 1.生成用户密码认证文件 安装工具 yum install -y httpd-tools创建密码文件 htpasswd -c /usr/local/nginx/passwd.db zhangsan #-c为第一次创建密码文件需要加上 htpasswd /usr/local/nginx/passwd.db lisi更改密码文件权限 由于之前设置过NGINX服务由nginx用户运行,设置只有nginx用户才能使用此密码文件 chown nginx /usr/local/nginx/passwd.db chmod 400 /usr/local/nginx/passwd.db 2.修改主配置文件相对应目录,添加认证配置项 vim /usr/local/nginx/conf/nginx.conf ...... server { location / { ...... ##添加认证配置## auth_basic "hello world"; #设置密码提示框文字信息 auth_basic_user_file /usr/local/nginx/passwd.db; } } 3.重启服务,访问测试 nginx -t systemctl reload nginx #systemctl restart nginx #reload不行再restart浏览器访问 http://192.168.80.101
访问控制规则如下 deny IP/IP 段:拒绝某个 IP 或 IP 段的客户端访问。 allow IP/IP 段:允许某个 IP 或 IP 段的客户端访问。规则从上往下执行,如匹配则停止,不再往下匹配。 白名单 allow IP/网段; deny IP/网段; 黑名单 deny IP/网段; vim /usr/local/nginx/conf/nginx.conf http { #allow deny写在http块中,范围最大,全部 ...... server { #allow deny写在server块中,范围局限于该站点的所有页面,更精细 location / { #allow deny写在location 块中,只有location匹配到了才会做控制,仅此一个页面 ...... ##添加控制规则## allow 192.168.80.200; #允许访问的客户端 IP deny all; #拒绝其它IP客户端访问 } } } systemctl restart nginx
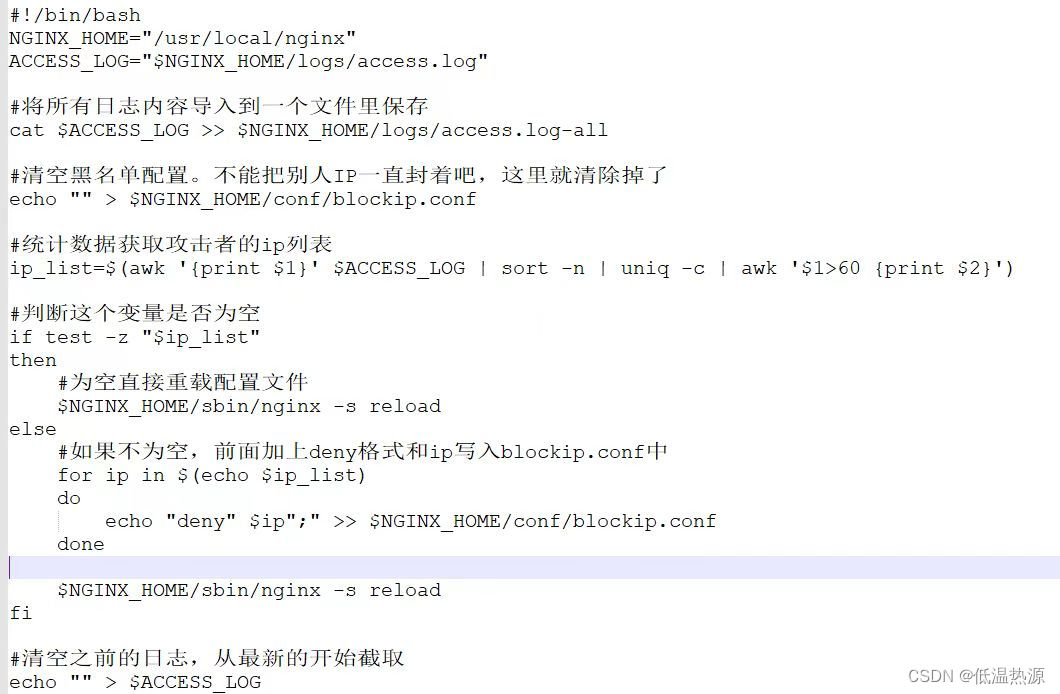
一个防DDoS的实例 1分钟内访问60次以上封禁 (此处脚本是对这个网站内shell脚本的优化) 详细部署步骤可以参考这个网站 服务又被攻击?Nginx + 简单脚本,轻松拦截
浏览器访问 http://www.xue.com http://www.benet.com ---基于IP 的 Nginx 虚拟主机--- 1.配置虚拟网卡区分IP(准备不同IP) ifconfig ens33:0 192.168.80.111 netmask 255.255.255.0 2.为虚拟主机准备网页文档 (刚刚已经做过) mkdir -p /var/www/html/benet mkdir -p /var/www/html/xue echo "www.xue.com" > /var/www/html/xue/index.html echo "www.benet.com" > /var/www/html/benet/index.html 3.修改Nginx的配置文件(不同IP) vim /usr/local/nginx/conf/nginx.conf ...... http { ...... server { listen 192.168.80.101:80; #设置监听地址192.168.80.101 server_name www.xue.com; charset utf-8; access_log logs/www.xue.access.log; location / { root /var/www/html/xue; index index.html index.php; } error_page 500 502 503 504 /50x.html; location = 50x.html{ root html; } } server { listen 192.168.80.111:80; #设置监听地址192.168.80.111 server_name www.benet.com; charset utf-8; access_log logs/www.benet.access.log; location / { root /var/www/html/benet; index index.html index.php; } error_page 500 502 503 504 /50x.html; location = 50x.html{ root html; } } }:35,79 co 80 快速复制 4.重启服务,访问测试 systemctl restart nginx浏览器访问 http://192.168.80.101 http://192.168.80.111 ---基于端口的 Nginx 虚拟主机---- 1.为虚拟主机准备网页文档 (刚刚已经做过) mkdir -p /var/www/html/benet mkdir -p /var/www/html/xue echo "www.xue.com" > /var/www/html/xue/index.html echo "www.benet.com" > /var/www/html/benet/index.html 2.修改Nginx的配置文件(不同端口) vim /usr/local/nginx/conf/nginx.conf ...... http { ...... server { listen 192.168.80.101:8080; #设置监听 8080 端口 server_name www.xue.com; charset utf-8; access_log logs/www.xue.access.log; location / { root /var/www/html/xue; index index.html index.php; } error_page 500 502 503 504 /50x.html; location = 50x.html{ root html; } } server { listen 192.168.80.101:8888; #设置监听 8888 端口 server_name www.benet.com; charset utf-8; access_log logs/www.benet.access.log; location / { root /var/www/html/benet; index index.html index.php; } error_page 500 502 503 504 /50x.html; location = 50x.html{ root html; } } } 3.重启服务,访问测试 systemctl restart nginx浏览器访问 http://192.168.80.101:8080 http://192.168.80.101:8888 |


【本文地址】